I have always been a list maker and a few years ago I decided that pretty clipboards were the perfect place for my lists. I have a shopping list clipboard at home and at my shop we have them for schedules, orders, time sheets and more. I am just finishing up a "Scott could you please…." clipboard too as EVERY time I ask him to do something he asks me to write it on a list….Now he won't have any excuse 'casue he'll have his very own clipboard !!!
Last year for Christmas I took a pretty clipboard shopping for the kids gifts and it saved me and kept me soooooo organized. When I saw Bella's "Christmas Wishes" line I knew I had to make them for the kids wish lists too…..and of course a new one for me to match :))

I wanted to share with you how I make the paper fit perfectly around the clip at the top….so here we go….

Start with a plain clipboard, a pencil, ruler and a piece of scrap cardstock.

Line up your piece of cardstock under the top of the clipboard as shown.

Make a small pencil mark on either side of the top portion of the clip as well as lined up with the bottom edge of the clip.

Using your ruler connect the lines and cut out to create template.

Cut your patterned paper to the width of the clipboard and lay it underneath the clip so you know where to trace your template.

Precision cut out the space for the clip.

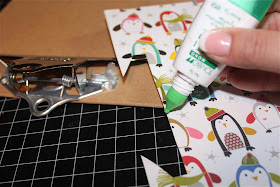
Add quick dry liquid glue to the back of your patterned paper.
Open clip and carefully place your patterned paper around the clip and smooth down to secure.

Then decorate and embellish as desired !!!


Emma and Alex LOVED filling out their cards and it was PERFECT for me so I knew exactly what they really wanted to see under the tree on Christmas morning.
I added envelopes to mine to keep my shopping list for each of them inside AND…..I can also tuck the reciepts in the envelopes 'just in case'…..
December is such a crazy busy month and now I can head out and get the shopping done with LOTS of time leftover to wrap !!!
Have fun creating your own holiday (or everyday :)) clipboards.....
j. xo


