my links

Tuesday, December 31, 2013

Guesting with Bella Blvd. Today

I'm up over on the Bella Blvd. Blog today with some fun layouts and a peek into how I create them !!


Like most Mom's, there are many hours in a week spent waiting for kids at practices and activities, so I always make sure I have my paper pad, a pencil and my very well used mini ruler .... I am in no way an artist and must have a nice straight line so i use grid paper to sketch out ideas for future layouts and projects so that when I go into my studio i have a bit of a head start on what I want to create !!  


I have tried and tried to stray from my linear style and step outside my own box, but I somehow find myself heading back inside the box making sure everything has a measurement .... i'm learning to accept it :)


On these layouts I did 2 takes of the same sketch as I knew I wanted to use (1) 4 x 6" photo on each.  'Santa Socks' stayed pretty true to my original notes. I love the Freestyle Sophisticates as a base rather than plain cardstock and the large 'chevies' was 
perfect for this Christmasy pic. 


I cut 'santa' using my Silhouette and finished the title using some Alphas + Bits.  One of my very fave additions to the Bella collections are the 'paper pieces' packages.  They are absolutely filled with fun bits to add to any project !!  


The best part of Bella Blvd. is that you are always able to pull an embellishment or 2 from older collections to use with the new, which is what I did here with the chip tree ..... a bit of typewriter journaling and this one is complete !!

For this layout you can see that I chose to use a larger yellow patterned paper in the centre rather than the red chevies down the middle.  I also used a 4 x 6" journal card as the title and built around it, adding my typewriter journaling on top.  


This photo of Emma really sums up our summer, so I had a lot to say and my handwriting is not super so I often turn to my typewriter to help me fit all I want to say into a smaller space :)


Again, I mixed the embellishments from a few collections, raising several with 3D foam.  I find it so fun to see how your own scrapbooking evolves based around the product you're working with. Stephanie has created such fantastic bits to pretty up our projects, that sometimes I have to remind myself that I don't have to find a spot on just one layout for every single chip shape and sticker !!!


I love that one sketch can result in 2 layouts that are similar but different and will both look fantastic in an album, even if they end up side by side !!  

Head on over to the Bella Blvd. Blog and check out all the other fabulous designers' inspiration ..... 

TFL ..... Talk soon.

Tuesday, December 24, 2013

..... a little bit of Santa on Christmas Eve

Merry Christmas Eve (& Christmas Day too :)) everyone !!!

Boy has it been a BUSY couple of days ..... but the baking is done, the house is clean (temporarily) and the gifts are wrapped ..... and the kids are EXCITED :))

I've been meaning to blog a few more of the holiday projects that I created over the past week or so but time flew by and here we are .....


I used some Core'dinations cardstock to make these fun little gifts.  Both are using cut files by Silhouette .....


These were sooooo easy to put together and i love how cute they look all done up.  The 'coffee sleeve' was put onto the new cup from Starbucks and given with a gift card and the 'santa bag' was filled with chocolates !!!

I am taking off for a few days now to hang out with the kids and Scott until he goes back to work on the weekend ..... and then I'll be back with LOTS of fun projects to share :))

I have so many exciting plans for 2014 and can not wait to share another year with all my crafty friends ..... xo

Wishing you all a VERY merry Christmas !!!

TFL ..... Talk soon.

Saturday, December 21, 2013

Core Christmas Tree Cards

Like many of you I know, I too have been making Christmas cards like crazy lately and I've got a couple to share with you today !!


I started with an A7 (5 x 7) David Tutera card base and put it through my embossing machine with my fave Darice snowflake embossing folder.


I created the first 'tree' by punching snowflakes from Core'dinations white Glitter Silk cardstock and rasied them with 3D foam.  I embossed a piece of brown cardstock from the Tim Holtz & Ranger Distress 4 1/4 x 5 1/2" paper pad (LOVE these - cardmakers NEED these pads) ..... I used the Darice woodgrain embossing folder and then sanded the top lightly to show the pattern !!


I added a star and sentiment from the David Tutera Celebrate Step 3 embellishment packs and finished this one off with some red twine ......


I created the 2nd card using the same steps but different cardstock !! 

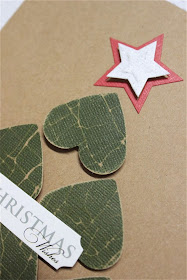
I started with the same kraft card base and then punched smaller heart shapes from Tim Holtz Kraft-Core Shattered cardstock and raised them using 3D foam .....


I punched a circle from the Tim Holtz & Ranger Distress cardstock pack and embossed it with a circle embossing folder and lightly sanded off the top for the 'trunk' of the tree ......


...... again the tree top and sentiment are from the Step 3 packs by David Tutera Celebrate with a little red twine wrapping it all up with a bow !!!


....... 2 different ways to create the same Christmas-y card featuring Core'dinations and David Tutera Celebrate !!!

TFL ..... Talk soon.


Monday, December 16, 2013

'mountain climber' .... Part 2

Yesterday I shared a layout of my boys climbing Mt. Rainier and today I want to share the mini album I created for all the other pics from their special day :))


I used this fun little Maya Road chipboard album and covered it front to back with this great Imaginisce collection ...... I added a piece of burlap underneath a few die cuts and finished off the cover with some twine and a couple of buttons too !!


LOVE these burlap Thickers by American Crafts .... totally my new fave !!!


Scott took so many great pics of their day but this one was by far my favourite one ... I was so proud of him that he thought to take a photo of their boots on the mountain - SUCH a great shot !!!


...... yes Alex was wearing shorts in the snow on the mountain in August ;))


This one speaks for itself ..... LOVE this boy of mine !!!

TFL ..... Talk soon.


my little mountain climber

Happy Monday everyone !!  I am sorry I've been so absent this past week-ish ..... as all you Mom's know, this is an absolutely CRAZY time of year with kids !!!

Mine are now out for the holidays for 3 weeks and I could not be more excited to spend this time with them .... I've been taking lots of pics of all the Chrismtas-y things I've been making and will share them with you this week right up to Christmas .....

..... but for now I have a few non-holiday related projects I thought you might like to see :))


Alex and Scott are HUGE into climbing and these pics are some of my faves from their first time hiking Mt. Rainier this past August.  We were in Washington for Em's riding and the boys had an amazing time exploring this fabulous mountain .....

...... and I was thrilled that Scott has been paying attention all these years as some of the pics he took were FABULOUS !!!


I used Core'dinations spotted cardstock for my base and then filled it all up using some great Imaginisce patterened paper and die cut shapes ..... finished it off with some fantastic burlap thickers by American Crafts and a little bit 'o' twine too !!!

I couldn't stop with just one layout of this fun boys trip so come on back tomorrow for a great little mini album that I created using the rest of the pics :))

TFL ..... Talk soon.


Wednesday, December 04, 2013

'thank you' card

I know we're in the holiday season but I wanted to share a cute little card that I made recently using some cute Imaginisce die cut shapes.

I created the 5 1/2 x 5 1/2" base using white Spotted Jillian Dot cardstock by Core'dinations (a FAVE) ..... I layered on a piece of striped patterned paper and then raised a square of multi-colored grid with rounded corners .....


I thought this cute little calculator die cut was so sweet so I added it slightly off the right edge and put the rule die cut along the bottom  .....

...... I used a Martha Stewart punch and 'poinsettia' Core'dinations cardstock for the 'thank you' sentiment  ..... I used my typewriter for 'i can always count on you' and added this underneath ..... a fun play on words with the calculator die cut :))


A little red and brown waxy twine wrapped around a few times tied in a bow to finish it off ..... so fun and ready to give :))

TFL ..... Talk soon.

Monday, December 02, 2013

Core'dinations Hops with Tombow

All this week Core'dinations is hopping with Tombow so get ready to see some fabulous projects and enjoy the chance to WIN a fabulous prize pack too !!


It's no secret that I am in LOVE with my Silhouette .... and Core'dinations cuts like a dream in this machine so I was able to use this fantastic, detailed cut file to create a couple of Christmas cards AND use my fave Tombow glue pen too adhere them !!


For this first card I started with a 5 1/2 x 5 1/2" kraft card base and added a 5 1/4" piece of white spotted cardstock.  I used THIS cut file for the Santa head and cut it using 'Nightfall' from the Core Essentials collection .  This file is perfect to be able to use the cut AND the negative image !!

I thought Santa need a little sparkle so I adhered this on top of 'Red Flash' from the Glitter Silk collection - LOVE this cardstock !!  

I wanted a bold sentiment for this card so using the same black 'nightfall' cardstock, I cut THIS file using my Silhouette.  It cut beautifully and to just the right size for this card.

A couple of pieces of twine and this card is ready to put in the mail  ....
 

For the card using the original cut I was able to really layer this as it is just an outline of Santa. To start I used another 5 1/2 x 5 1/2" card base from the David Tutera Celebrate collection and layered on a piece of black Jillian Dot Spotted and then a piece of Scarlet Tillie Dot Spotted cardstock.

Using a snowflake embossing folder, I ran a piece of Pearl Gemstones cardstock through my embossing machine and the rounded the corners.


The Tombow Glue Pen became a VERY important adhesive in my kit a LONG time ago.  It is exactly what you need to adhere these tiny little pieces with.  It writes on like using a pen and the adhesive is super strong .... for my larger pieces I am addicted to the Tombow Mono Multi liquid glue - LOVE this one and has been a fave of mine for many years.  Definitely a staple for anyone that truly wants their product to stay where they put it ;))


I wrapped some twine on this one as well and added the same sentiment to finish it off ..... They look so cute side by side - a shame to mail them (but I will ;))


Thanks so much for stopping by ..... now make sure to head over to the other girls' blogs today AND ALL WEEK LONG !!!

Don't forget to check out the Core'dinations Blog AND the Tombow Blog too for a chance to WIN .....