Tuesday, April 30, 2013

Day 2 in my week of layouts .....

As promised, another fun layout for your inspiration ......


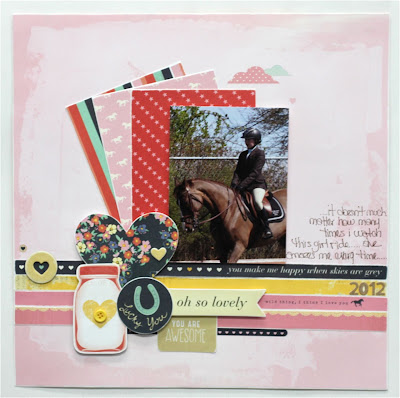
It's no secret that I absolutely LOVE LOVE LOVE this 'Lucky Charm' collection from American Crafts ..... i have used it for so many types/themes of layouts ..... including this sweet picture of my girl on her pony !!

If you want to create this at home with your fave collection, here are a few quick instructions:

  • 12 x 12" patterned paper base
  • Cut (3) patterned papers to 4 x 6", sand edges and adhere in a fan shape as shown with the 3rd one facing straight on
  • The photo is 3 1/2 x 5" and is raised using 3D foam
  • Adhere (4) 1/2 x 12" paper strips underneath as shown
  • Title and embellish as desired :)))

Come on back tomorrow for another one .....

TFL ..... Talk soon.
j. xo

Monday, April 29, 2013

Great weekend and a layout ......

Happy Monday (and Happy Birthday to my husband ;))

It's been a few days as I was busy prepping for a FABULOUS workshop that I taught HERE  this past Saturday .... (30) ladies and I spent 12 hours creating (20) layouts !!  What a great day ..... Every day this week I will share a new one of those layouts here for your inspiration at home ......


I am loving all the great wedding papers and embellishments by Bella Blvd. Scott's youngest brother got married last Summer and of course I still have the photos to scrapbook ;))

Scott was in the wedding party and Alex HAD to have a suit like his Daddy so of course I HAD to have LOTS of pictures !!!

Come on back tomorrow for another layout to get you inspired ......

TFL ..... Talk soon.
j. xo

Wednesday, April 24, 2013

4/23 Sketch Challenge

.... it is VERY rare that I get the chance to play along with some of the AMAZING online scrappy challenges that are always goin' on .....

..... but when I saw this one from Lily Bee Design - i LOVED it and sat right down !!


The 'Sweet Shoppe' paper is so seriously sweet ..... LOVE the little mini chevron paper and it was perfect for my base.  The light heart pattern worked well underneath a few of my most fave pics of the day Alexander was born !!!


I had a lot of fun putting all these embellishments together ...... I punched a few hearts from more Lily Bee paper and added a couple of pieces at the top left too !!  I am loving these great Ali Edwards/Technique Tuesday journal cards so I tucked one under some AC Thickers, a few more paper strips from Simple Stories, super fun alphas and word stickers by Jillibean Soup ......

......BUT my fave little piece is the twine heart with the Bella Blvd. sticker on top !!  I punched a heart from cardstock, covered it in adhesive and started wrapping the twine around and around until I had the cutest little twine heart :)))

I love how much fun I had with this great sketch by Lily Bee ...... so I am going to head back into my office and work on a few more projects that you'll get to see soon !!

TFL ..... Talk soon.
j. xo

Monday, April 22, 2013

Exciting News !!!!

Hey everyone - I'm back from a week away horse showing with my girl (she was AMAZING - LOTS of great wins :)) ...... and I have some SUPER exciting news to share !!


I am one of the newest members of the Core'dinations Design team !!! You can check out the rest of the gang HERE ...... I'm SOOOOO excited as i absolutely LOVE this company and the great people behind it .... seriously cannot wait to get started :)))

I know I also promised you layouts last week and I am so sorry but I went away with Em and got all caught up in her and her horses BUT .... I am home and back to 'business' !!!

Here is a new layout for you to create at home with the Fancy Pants 'Park Bench' collection or another current fave you've been dying to 
work with .....

  • I started with a 12 x 12 creme piece of spotted Core'dinations cardstock for my base
  • Cut a few strips of 'Park Bench' pp and wrapped some bakers twine around them
  • Sanded the edges off of the pre-punched pennant pieces and tucked them just under the bottom edge of the pp strips
  • Tucked my photo in the top left and added felt embellies along with punched shapes from the other pp in the collection 
  • Finished it off with a few wordy stickers and the date


.... i LOVE how this came together - PERFECT colors to coordinate with Em's jammies :))

TFL ..... Talk soon.
j. xo

Saturday, April 13, 2013

....and 2 more

I wanted to share my last (2) projects that were featured on the Bella Blvd. Blog this week for the DT team up with Petaloo !!

I have had several sizes of these fun cross stitch hoops hanging in my office for a while now and this was the perfect time to break one out and pretty it up! I love the quote from a sticker in the 'Sand and Surf' collection and decided to make that the starting point of this wall hanging.


First I chose the patterned paper and cut it to fit the inside wooden circle. I adhered it to the wood and once it was dry I fit the top circle on to pull it tight and create my base. I used (3) different alpha sets for the title and punched a few scallop circles to mix in with all the Petaloo flowers and gems.


 I love these paper flowers. Some are flat, some are embossed and the colors were so perfect to coordinate with the great Bella colors. I did LOTS of layering of flowers from different sets and the gems and mini flowers completed them beautifully. Such a great addition to my office/studio wall.


It's funny that I am really not a very pink girl (I can almost hear Stephanie 'pink loving' Hunt gasping), and yet this layout is completely and totally pink everywhere you look. These photos are from a baby shower that I attended almost a year ago where I was so taken with this amazing candy bar. It was set up so beautifully in the dining room on a wall with a great floral painting as the backdrop. 


Mixing some Petaloo paper flowers, brads and ribbon into this layout coordinated with the color in the photos perfectly. I love the long 'notebook' style journal stickers that are included in each collection but the floral print on this one didn't match so I used this as a great place to adhere a few Petaloo flowers and added stickers from the miniatures raised in the center of each. I used more of the Petaloo ribbon to separate the photos and love how it pulled it all together. I added a few smaller flowers with the Petaloo pearl brads in the center onto the chip title, some designer tape along the top and bottom and chip borders too.
  

.....I've got another great layout with instructions for your weekend inspiration so come on back !!

TFL ..... Talk soon.
j. xo

Friday, April 12, 2013

My turn for the Team Up !!


All week long the Bella Blvd. DT and the Petaloo DT have been sharing projects using each others product !!  Today it is my turn .....

I got a wonderful selection of paper flowers, brads and ribbons from Petaloo to mix in with my Bella collections on a variety of projects !!

I've got 2 projects for you here today and 2 more tomorrow ..... so make sure you come on back :))


I love using ribbon on a card and this (4) pack of ribbon from Petaloo was perfect to mix with this floral paper from the 'Sand and Surf' collection. I started my card by adhering the piece of patterned paper first. I added a strip of each of the 4 different ribbons next and then layered some of my favorite pink flowers in the corner. 


The glittery brads by Petaloo are so fun and looked great mixed in with some of their glittered flowers. I added a flower button with twine and a little sentiment to finish it off.

These glassine bags come in all sizes and are perfect for everything from gift cards to candy (they're food safe). But my favorite part about them is that you can emboss them. I ran it thru my Big Shot using a dotted embossing folder first. Then I adhered the yellow arrow sticker to the bottom portion of the bag and added a piece of a polka dot border sticker too. 


I folded a paper doilie over the top where the bag closed and adhered it in the center. The Petaloo paper flowers in this pack are awesome as they are all different shades of yellow mixed with white and polka dots too as well as being embossed so all the pieces worked so well together for my 'dot' theme. I added a white button and some twine on top of the flag stickers and then put '4 you' on the bottom to finish it off. Totally ready for the next time I have a little gift to give.


Come on back tomorrow for my other (2) team up projects and then some layout inspiration in the coming days too  !!

TFL ..... Talk soon.
j. xo


Wednesday, April 10, 2013

'hey there' card ......

I'm sorry I haven't been on here much this past week but I've been making all kinds of fun projects that you'll get to start seeing now !!


I made time to play with this AMAZING paper and embellishments from Fancy Pants Designs .... Their 'Park Bench' collection was one of my fave releases at CHA and it's been sitting on my desk begging me to do something with it !!


I made enough time to get started with this cute card ..... the black, blue and yellow all mixed together makes me so happy !! Lots of layering and those felt flowers - seriously LOVE :))

Now back to my layout >>>>>>

TFL ..... Talk soon.
j. xo

Monday, April 08, 2013

Bella Blvd. and Petaloo Team-Up

This is an exciting week over on the
Bella Blvd. and Petaloo Blogs !!  The designs teams have shared product and created fun cards, layouts and altered projects that will be shared all week long !!


You'll get to see what I created later this week but for now head on over to these 2 great blogs and get inspired by some of the other designers ......

AND ..... ENTER TO WIN !!  You can win some fabulous product HERE and HERE ..... 


Come on back for more layout inspiration from me tomorrow :))

TFL ... Talk soon.
j. xo

Wednesday, April 03, 2013

.....more "All American"

These were featured on the Bella Blvd. Blog this week for more 'All American' inspiration so I wanted to share them here too so you can sit down and make them at home for your next 
party or ... ???!!

These are quick and easy little containers to make so are perfect for celebrations like 4th of July parties. 


I made these ones a bit bigger than I usually would and cut them to 6 x 6". I sanded the edges and adhered each using quick dry glue into a 'roll' and let them dry.
  

I pinched the bottom together and then the top the opposite direction to create to shape of the container. I used my paper crimper on the top and bottom of 2 and then used my border punch on the others.


I used David Tutera Celebrate by Core'dinations pre-made tags (LOVE these) and they were the perfect size for the 6" treat containers !!!


REMEMBER .... these are super quick and easy to make for ANY occasion :))

TFL ..... Talk soon.
j. xo

Tuesday, April 02, 2013

..... A Fun New Layout

I'm back ..... My family went on a fun little 5 day mini vacation over the Easter long weekend and had an absolute BLAST .... I'll share some pics later this week !!

But for now I've got a fun layout featuring the new "All American' collection by Bella Blvd.


This was such a fun trip for me. I love spending time in the US and this was a special treat to get to spend time in Milwaukee for a good friends baby shower. I was there for 5 days and I am certain all we did was eat. We did make some time to scrapbook, shop, eat some more and of course have the baby shower! 


I was so excited for the All American collection as I have a TON of photos from this trip (and others) and this is perfect for them all. The colors are fantastic and they coordinate with so many of the other Bella pieces from Sophisticates and past collections too. So fun and easy to work with. 


Come on back tomorrow for another fun project using this great collection !!!

TFL .... Talk soon.
j. xo