Tuesday, February 05, 2013

some LOVE for you .....

Sorry I've missed a couple of days .... skiing with the fam (AWESOME) ..... and now a sick little boy at home :((

BUT .... it gave me a bit of time to play around with my blog !! I've been wanting to change it up a bit for a while but never can find the time ..... Something clean, fresh and ready to show off the incredible color of my projects :))

Today I've got a quick and easy Valentine's Day card to share with you .....


The black cardstock base is an A2 card (4 1/4 x 5 1/2") from the David Tutera Celebrate card making system ....... and so is the sticker sentiment (LOVE these)


The patterned paper is from the Bo Bunny 'Love Letters' collection .......


......and those adorable glittery hearts you ask ?!  They are Studio Calico Wood Veneer Shapes that I glittered up myself to match the card :))

You can get all kinds of these great shapes HERE .....

Come on back soon, as always, i've got more to share :))

TFL .... Talk soon.
j. xo

Sunday, February 03, 2013

a little 'Memories' layout

This was one of my very favorite collections of CHA Winter and I was so excited to be able to come home and play with it.....

released (4) incredible collections and I am so excited to add this layout to my album !!


One of the BEST parts of this collection is the weight of the paper .... it is FABULOUS and lets you add so many of the FABULOUS embellishments that go along with it ....


There are die cut shapes, chipboard, buttons, brads .....


.....journaling cards, paper strips, stickers and more !!!

Make sure you watch THIS STORE to see when it all hits the shelves so you can get yours and get it into your albums, onto your cards and wrapped around all your altered projects too .....

TFL ..... Talk soon.
j. xo

Saturday, February 02, 2013

Core'dinations Sketch Challenge

Core'dinations DT member Lydia Jackson created this great sketch challenge and I was super excited to play along ......

This is her sketch ..... You can check out her layout based on her sketch HERE 


For my take on the sketch, I decided to create it on a 12 x 12" wall canvas using some of my favorite embossed Core'dinations as well as a few pieces that I embossed with my Big Shot and embossing folders .......


I combined some great Jillibean Soup product for the patterned paper and embellishments.....


......a few die cuts, journaling cards and a flag were perfect with the colors of cardstock.....


.....and i spelled out my journaling spot using mini alpha stickers too !!

Make sure to head over to the Core'dinations blog for more fun inspiration on how to get the most of your cardstock AND instructions on how to participate in this challenge too  !!!

TFL ..... Talk soon.
j. xo

Friday, February 01, 2013

"Lucky Charm"

Are you excited for new CHA product to start hitting the STORE shelves ?!

I sure am ... but until then I have a few layouts i've been working on with some sneak peek bits I brought home with me from Anaheim !!

First up .... Dear Lizzy "Lucky Charm" - LOVE LOVE LOVE this collection and seriously can not stop using it .... (2) new layouts down and MANY MORE to go :)))


The combination of colors in this collection is AMAZING and for me it's all about the bits of NAVY BLUE - LOVE .....


The papers are full of FABULOUS patterns that are going to work for ANY photos you need to get scrapped ...... including these horsey pics of Emma :))

Keep checking back as I'll be sharing more AND i'll tell you when you can get this great product HERE .....

TFL ..... Talk soon.
j. xo

Thursday, January 31, 2013

3D Cards ....

Today I thought i'd share a few more cards with you .....

..... These are both the type of cards that I'd give with a gift as they're pretty 3D :))


This card base is from the David Tutera Celebrate by Core'dinations collection and comes with that pretty scalloped edge !!!  LOVE these card bases.....as well as the sticker sentiment which is also from the DTC collection by 


I used several punches on this card and raised some pieces using 3D foam as well as adding a great wooden button by Bella Blvd. and a few black jewels too :))


This butterfly card is equally dimensional ...... I adhered flat patterned paper pieces before the hand crafted embellishments ......


The florette was crafted starting with a strip of kraft cardstock that I border punched along the edge before scoring and folding it into this great base to the large butterfly punched piece.  I added a couple smaller butterflies and a few green jewels too !!

These are GREAT quick and easy cards to whip up using all the bits you have from your last layout or altered project :)))

TFL ..... Talk soon.
j. xo

Beach Party Set

Some of my CHA projects were shared on the Bella Blvd. blog this past weekend but I wanted to do a little share on my blog one at a time .....

I'm going to start with this fun beach party set and table decor.....


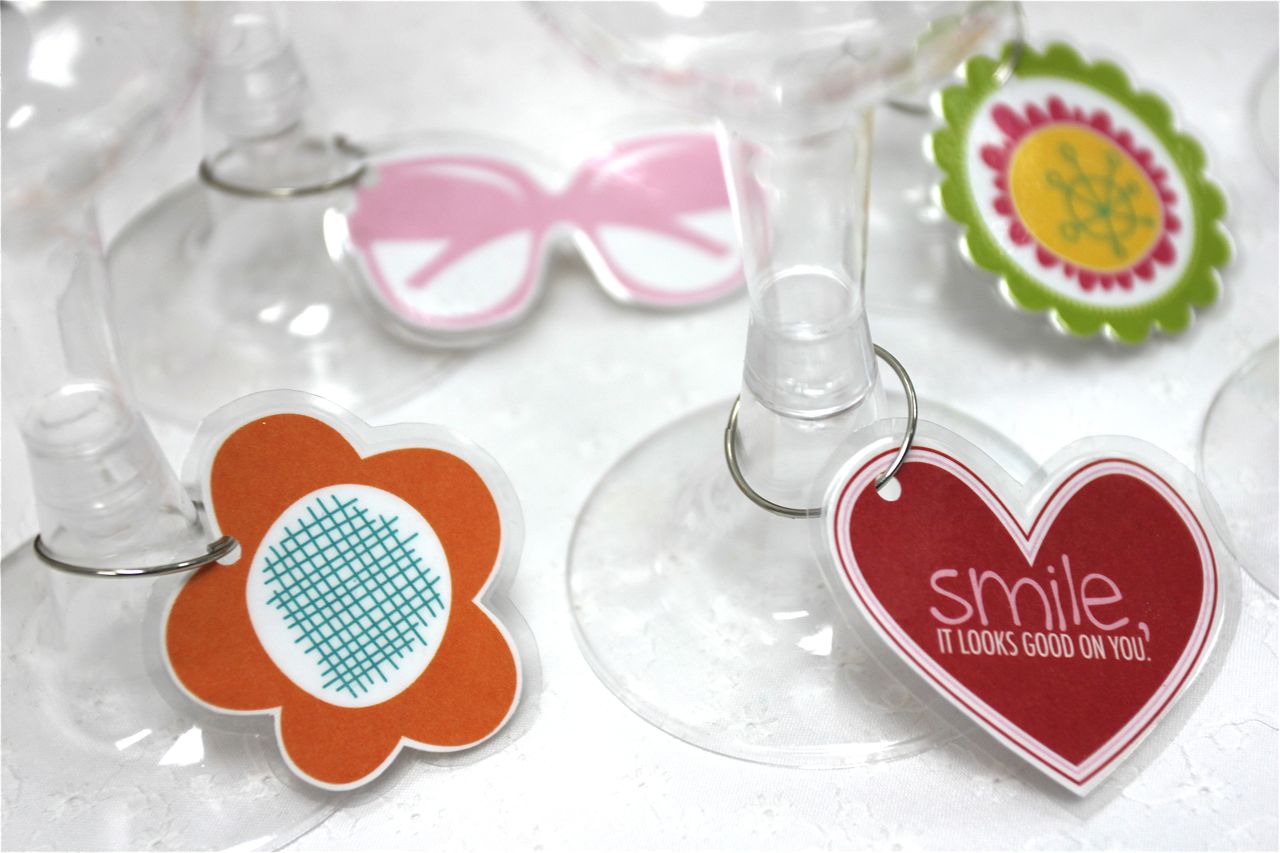
Summer BBQ's are huge for us as we live in a beach side community. Whether it's a backyard beach themed get together or a picnic on the beach, Sand & Surf is the perfect collection for party EVERYTHING. Invitations, favors, menus, table décor, pretty straw embellishments and my personal fave, wine charms.


I started with this great wicker table caddy that had a coordinating napkin holder and I knew I could jazz them up .... To start, I added knots to my twine every couple of inches and then added a wooden button as I wove it throughout the base of the caddy. Once I had it all the way around I tucked mini glue dots behind each button to make it stay exactly where I wanted it.


I am so happy with how the straws came together. I cut strips of patterned paper approx. 1 1/4" wide by 3", sanded the edges and used the largest circle on my Crop A Dile to punch holes in the top and bottom to slide them over the straw. I used stickers, Cute Cuts and Designer Tape to create fun embellishments on the paper slides. Stick them in the kids drinks and they know who's is who's.


Everyone always needs wine charms (right, girls?) and this collection has the PERFECT bits for a really cute set. These were super easy to make. I chose the pieces I wanted from the Cute Cuts and stickers and ran them through my laminating machine. Once they cooled, I precision cut around them, punched a tiny hole in the edge and added narrow binder rings to each – so easy and so cute.


The coordinating napkin holder was cute but it had some funny bits of wicker tied to the center of it so I laminated a large flower sticker, punched 2 tiny holes in the center, wrapped twine around the bar and then up and thru the center of the flower and tied it off with a wooden button. Just had to add one more button and a fun phrase and it matched perfectly with the table caddy.

Last but not least, this party needed a menu. The fun bright colors of this collection work for any summer décor so I used the aptly named 'Paradise' paper for my base and then continued to scrapbook the rest, adding the menu and games list where the photos would have been. As I've said before, I am a big Designer Tape lover, so I had to use more of the new colors on this mini project as well. I ribbon folded it back and forth and then pressed it down flat along the edges of the green base, menu and game list. All that was left was the title using my favorite High Five Alphabets and this party set is complete.


I've got some more cards to share tomorrow so come on back :))

TFL ..... Talk soon.
j. xo