Saturday, June 29, 2013

Organization anyone ?!?!

We all are looking for new ways to stay organized in our scrap spaces right ?!  Well this post is all about my new way of organizing all my Bella Blvd. paper, stickers and chip shapes ..... This was featured on the Bella Blog the other day but I wanted to share it here for you as well - ENJOY !!


I've wanted to use one of these great wooden 'milk' crates for some time now but wasn't sure how I was going to fit it into my scrap space. I've been wanting to do some re-organizing of my Bella paper and bits and found that this crate was the perfect size.


I immediately got out all my Designer Tapes and started covering the slats. For the grey and gulf on the top I added a layer of Mod Podge as this will be a pretty high traffic area. Once I had all the slats front and back covered I traced the ends using some freestyle sophisticates and adhered them to each end and on the inside as well.


I covered over this with a layer of Mod Podge as well. To make sure that my paper envelopes didn't fall through the openings in the bottom of the crate and cut 2" wide strips of more sophisticates and adhered them vertically inside to create a real base to sit my paper packs on top of.


I had some leftover Bella fabric ruffles from my stool project so I adhered this to the front using my hot glue gun. I tied twine through some wooden buttons and adhered them onto some Blooms a Bella and put them on the left to cover the seam of my fabric ruffle. See if I didn't tell you, I bet you wouldn't have noticed.


Then I sorted all my Bella Blvd by collection into plastic envelopes. I have always kept it flat in paper trays so it was already organized but I added the Just Write Journaling Stickers and the Alpha+Bits as well as the coordinating miniatures and Chip Shapes too. I used my label maker to title each package with the collection/collections that are inside. This way I can easily find a full line and just have to turn to my embellishment storage for the flags, buttons, tapes, etc. EASY and I LOVE how it came together.
back and check it out !!

TFL ..... Talk soon.
j. xo

Thursday, June 27, 2013

Wooden Stool for Bella Blvd.

This fun project was featured on the Bella Blvd. Blog the other day but I wanted to share it here for those that may have missed it !!!


All my work surfaces in my office are quite high so I use a 'bar stool' to sit on while I work. I like to prop my feet on something so I decided to create my own little custom stool just for me! I found this square one at a local craft store and the height of it was perfect. I love the look of patchwork/quilting so I decided this would be a great way to incorporate some fun Bella color into my space on a truly usable piece....


For this square wooden stool I started by lightly sanding the rough edges before spraying it with white paint.


Once it was dry, I added a strip of designer tape along each of the 4 edges and covered it with Mod Podge.


Then I cut patterned paper into 1 1/2" squares and adhered them on top and I covered the entire top with Mod Podge.


I love that Stephanie created fabric to go with so many of the paper designs. I created a ruffle to go with the paper on top and adhered it around the edge using my hot glue gun. This was such a fun project to create and I love how it looks in my office.


Come on back tomorrow to see where I put the leftover fabric ruffles ;))

TFL ..... Talk soon.
j. xo

Wednesday, June 26, 2013

Blog Hop .... and today is my turn !!!

There's a blog hop going on this week and today is my day to play along !!

Core'dinations has teamed up with this fantastic manufacturer from Australia and both design teams have been working hard to offer you some amazing inspiration .... Make sure you head over to both the Core'dinations Blog and the Couture Creations Blog and see what everyone's been up too !!


I was so happy to get to sit down and play with this fantastic Doily Die by Couture Creations !!  I started by taking a piece of White Wash (Grandpa's Trunk) and laying it over top of a piece of Spotted Jillian Dot cardstock.  I lightly sanded over the whole surface to get the same spotted look onto the White Wash.


I chose a piece of black and grey from the Naturals collection and a piece of 'lemonade' from the Vintage 6 x 6" pad.  I ran each of these through my Big Shot using the 'Irish Dreams' die from the Fantasia Collection by Couture Creations.  The impression of these dies onto the Core'dinations cardstock is really impressive !!  The die pattern is so intricate but you get to see every little detail …… I was also lucky enough to get to use the new Couture Creations double sided tape.  This is a fabulously strong adhesive and it adhered my embossed cardstock pieces like a dream – great adhesive !!!


I sanded off the top layer to show the lighter color core and then precision cut around each of my pieces to create perfect sized photo mats for these sweet pictures of my now 12 year old girl on her very first Easter !!


I added some  ribbon and twine to create a great space for some embellishments along the bottom.  I added a few punched butterflies from the 4.25 x 5.5" Tim Holtz & Ranger Distress paper pad (LOVE this pad) …. I finished it off with some jewels from the David Tutera Celebrate collection and a spot of journaling typed onto a small piece of White Wash 'Grandma's Rocker' …… LOVE how this all came together !!

Come on back tomorrow for a fun altered project share ....

TFL .....Talk soon.
j. xo

Monday, June 24, 2013

'Hipster' anyone ?!?

Happy Monday :))  
We had a SUPER busy weekend around here .... It was Alex's 8th birthday on Friday and it went on all weekend long :))  

I'm going to post some pics tomorrow as of course I made some fun invites and decor for the science-y theme !!

BUT .... today I have a layout that I created using 'Hipster' by Basic Grey .....


I picked up this fun collection while visiting my friend from The Memory Workshop in Maple Ridge and LOVE it ......

The muted basics with pops of bright color work for almost any photo and I have had these 2 sitting on my desk for months from our road trip into the US last summer !!

I love all the journal cards, stickers and little bits .....


I added a border sticker to separate my photos from the embellies on the left ..... I even got a couple of epoxy brads in there along with my typewriter journaling on some White Wash from Core'dinations too  ..... Added a title with my new fave burlap Thickers by American Crafts .....

Sop by tomorrow and check out all the fun birthday pics :))

TFL ..... Talk soon.
j. xo

Friday, June 21, 2013

A Jillibean Soup Layout .....

I wanted to share this sunshiney layout that I created using some of my favorite Jillibean Soup .....


I used a tiny polka dot pattern for the base and added a kraft pattern from Elle's Studio on top as well as a super fun corrugated blue piece by Fancy Pants (LOVE this paper) ..... I framed my 2 photos using the AWESOME 'instagram' style placemat pieces.  These are too cool ......


At the bottom I folded a wide bold piece of striped ribbon to create a border.  The embellishments from The Chilled Cucumber Soup collection are so fun ..... I added a journal card, created some flags, punched a butterfly from more patterned paper and LOVE LOVE LOVE their 'Wise Words' stickers so added 'happy' under the journal card......


I used a couple of mini wooden frames by Studio Calico and cut up another Jillibean journal card to create the kids' age in behind - cute right :))

This is birthday party weekend for my now 8 year old boy ...... LOTS of food to get ready :))

Come on back Monday for another fun layout featuring some fun Basic Grey ....

TFL ..... Talk soon.
j. xo

Tuesday, June 18, 2013

June Cards Magazine

Today I wanted to share with you a card that I had published in the June issue of Cards Magazine !!


There is a mix of Bella Blvd., Jillibean Soup and a bit of Bazzill cardstock too all on a David Tutera card base !!!

This is a fantastic issue so go make sure to pick up your copy :))

TFL ..... Talk soon.
j. xo

Monday, June 17, 2013

Happy Monday

Happy Monday everyone !!  
Sorry it's been another week since I've been around here BUT that doesn't mean that I haven't been making pretty things :))

I've got lots of fun projects to share in the coming days / weeks both here and on the Bella Blvd and Core'dinations blogs too ....

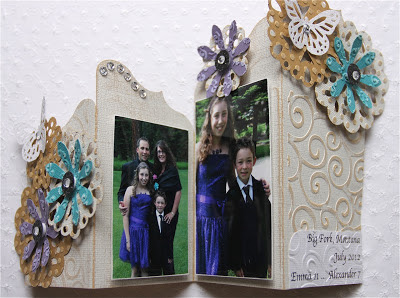
First up is a super fun folding card that was featured on the Core'dinations blog a few days ago ....


I am pretty new to the Silhouette game but have been having so much fun finding new pieces to cut out and turn into great projects !! I loved this folding card and thought it would be great to add a couple of photos to as a gift…..It would look so cute on a shelf, mantle or bedside table too !!


I cut the base using the Kraft-Core Nostalgic Collection (No.23) and then ran either end thru my die cutting machine with swirly embossing folder. Then I sanded off the top layer to show the kraft underneath as well as the edges of the base too. I cut a few more doilies out as well and embossed both sides of the same cardstock and sanded off the top layer to those as well.


I punched a few flowers from some of the Core Essentials that coordinated with my photos and layered all the pieces together finishing them off with a little circle punched from my fave Core Couture in Black Tie. I added a couple of Core Couture butterflies and some clear gems from the David Tutera Celebrate collection too !! I really love how this all came together and is perfect for any occasion !!


Come on back all week long for some more fun projects and layouts for your inspiration !!

TFL ..... Talk soon.
j. xo

Saturday, June 08, 2013

2nd of (2) Doubles .....

Today I am sharing with you another double page layout .... This one has NINE large photos on it !!  We are all looking for ways to incorporate more large photos onto our layouts so this is a perfect layout to scraplift ..... AND i am even including the instructions below to make it easier :))


Supplies Required:

  • (2) 12 x 12" same color cardstock for your base
  • (1) patterned paper
  • (5) 3 1/2 x 5" vertical photos, (2) 3 1/2 x 4" vertical photos, (1) 4 x 4 1/2" horizontal photo and (1) 4 x 6" horizontal photo
  • Coordinating patterned paper bits to punch circles from to embellish
  • Coordinating alphas, journal card ect..... 


  • Start with (2) of the SAME 12 x 12" cardstock for your bases (slate grey)
  • Using (1) patterned paper cut 2 x 10 1/2" and 2 x 7"; Round the bottom right corner of the smaller piece and the bottom left corner of the left.  Sand the edges and adhere at the center 1/2" up from the bottom as shown
  • I sanded the edges of all my photos to show the separation between each of them
  • You will need (5) 3 1/2 x 5" V, (2) 3 1/2 x 4" V, (1) 4 x 4 1/2" H and      (1) 4 x 6" H photos
  • All (5) 3 1/2 x 5" photos are flat on top of the patterned paper strips as shown
  • Adhere the (2) 3 1/2 x 4" photos on top of the others on the right page
  • Adhere the 4 x 4 1/2" and the 4 x 6" photos on top of the others on the left page
  • Title and embellish as desired


TFL ..... Talk soon.
j. xo

Thursday, June 06, 2013

1st of (2) Doubles ...

I spent this past Saturday teaching a fabulous group of women in an all day layout workshop ..... I promised them that I would post a couple of double page layouts on my blog this week ..... So here is the 1st of (2) ..... WITH INSTRUCTIONS !!!!


Supplies required:

  • (2) of the same patterned paper for your base
  • (2) additional different 12 x 12" pieces of patterned paper
  • Designer (washi) tape (one color)
  • Border strips 
  • Border stickers
  • (6) 3 x 4" vertical photos
  • Alphas and coordinating embellishments


  • Start with (2) coordinating 12 x 12" patterned paper for your bases (tan arrows)
  • Cut (1) patterned paper (yellow) to (2) 4 1/2 x 11 1/2" pieces.  Round the corners on the top left of one and the top right of the other as shown
  • Sand the edges of these and adhere at bottom of bases lined up with the centre edges as shown
  • Cut (1) pp (green) to (2) 3 x 11"pieces.  Round the corners on the top left of one and the top right of the other as shown
  • Sand the edges of these and adhere at the top of the yellow pieces lined up with the centre edges as shown
  • Adhere designer tape (washi tape) at the top of each of the bases as shown (blue)
  • Adhere patterned paper strip just under this as shown (pink)
  • Adhere (2) border stickers at bottom of layout overlapping yellow patterned paper as shown
  • Adhere (3) 3 x 4" photos to each page.  The outside (2) are flat and the centre photos are raised using 3D foam
  • Title and embellish as desired


Have fun with this one and come on back on Saturday for the 2nd Double Page layout .... again WITH instructions :))

TFL ..... Talk soon.
j. xo

Tuesday, June 04, 2013

Blog Hop .....

Good Morning !!  I told you yesterday that there was a SUPER fun blog hop going on this week and today is my day to play along ..... 3 fabulous manufacturers shared their product with all 3 design teams and YOU CAN WIN great prizes by checking out all we've created to inspire you !!


All the details on how to enter are HERE ..... or you can comment on THIS POST to enter to win here .... for more chances to win visit each designers site and comment there too !!  Good luck .....


For my first card I started with a David Tutera Celebrate card base.  This card is A7 (5 x 7") and was perfect for the May Arts ribbon that I wanted to use ..... This great white felt floral ribbon caught my eye immediately so I decided to create the background of my card using it.  I cut 3 strips and adhered it to my base then started to build my card on top of it !!


I used (5) colors of Core'dinations cardstock from the Tim Holtz & Ranger Distress Collection.  I punched embossed flowers from each piece and sanded off the top before adhering them with 3D foam.  I used a Stampendous stamp that says 'created with love' and heat embossed it using a beautiful gold Stampendous Embossing powder ...... I added this to the centre of a flower raised with 3D foam and wrapped more May Arts ribbon just below to finish it off !!


I couldn't stop at just one so I made another :)) I used Core'dinations 'Snowflake' cardstock for the base and made it into a 4 1/2 x 4 1/2" card.  I cut (6) 4" strips of the May Arts yellow gingham ribbon and adhered them end to end using a glue dot.  Then I layered them on top of each other to create this super dimensional flower !!!


I punched a few leaves from a piece of Core'dinations green Distress Collection cardstock and tucked them ender the edges of the flower.

In the centre I added a butterfly and a sentiment sticker from Step 3 of the David Tutera Celebrate collection - love this one !!

NOW .... head over to check out Jill Lebbin: http://everydayisanoccasion.com

TFL ..... Talk soon.
j. xo

Monday, June 03, 2013

EXCITING week .....

This is a super exciting week over on the Core'dinations Blog, the May Arts Blog AND the Stampendous Blog .....


That means 3 teams will be sharing their work with you all week long and that also means PRIZES ...... Make sure to check out all the designers work and ENTER TO WIN !!!

...... and then come on back to check out what I've created using these fabulous manufacturers ......

TFL ..... Talk soon.
j. xo

Sunday, June 02, 2013

A Vacation Mini ......

This was just up on the Bella Blvd. Blog and I thought I'd share it here too in case you missed it :))


If you're like me you have a friend (or five) that do not scrapbook in the slightest BUT love the look of it all. I wanted to create something for a friends' recent vacation that wasn't too time consuming but was the perfect little keepsake for a few of their fave photos of the trip !! 


To create the mini album (finished size 4 x 5 1/2") I cut (2) pieces of patterned paper to 5 1/2 x 12" and scored them at every 4".  I sanded the edges of the side that I wanted to be my base and then overlapped one 'page' and adhere together using a strong quick dry glue. 

  To finish the album I embellished each page as though it was it's own mini layout making sure to leave space for photos and dates.  The back of each page is also blank to add more photos it they like !!
 

The 'envelope' measures 4 1/2 x 6" and was cut using my Silhouette.  I used kraft cardstock for the base and embellished it with a border strip, cute cuts and alphas.  


To close it at the back I punched out 1" circles from patterned paper and adhered them to the envelope using button shaped brads.  I added some colored twine to tie it closed .... throw in an adhesive runner and it's good to go !!!

TFL ..... Talk soon.
j. xo


Saturday, June 01, 2013

Wine Tags with Bella .....

I wanted to share a couple of projects that I did this month for Bella Blvd.  Today I have some cute wine bottle tags .... who doesn't love wine ??!!  It took me until I was 30 to really enjoy it and a few years later I am now completely hooked ;))


I always like to take flowers and/or wine when we visit friends and usually end up just taking the bottle.  I've seen different versions of cute wine tags here and there so I decided to try my own with some Bella Blvd. 


I cut each base piece of patterned paper to 3 1/2 x 8" and punched a 2" circle in the top to fit over the neck of the bottle.  I rounded the corners on a couple and not on the others but sanded the edges of them all before I started embellishing.


Mixing the Engaged At Last and Love and Marriage was perfect for these fun tags.  The journal cards made a great start on a couple and adding in cute cuts, borders, stickers, feathers and a button too really pulled them together !!


These were super fun and easy to put together for literally any occasion ..... My wine will never be 'naked' again :)) 


Come on back tomorrow for a cute little mini vacation gift album :))

TFL ..... Talk soon.
j. xo